
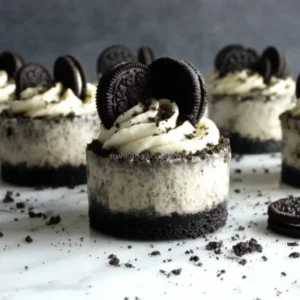
No-Bake Oreo Cheesecake: A Dreamy, Creamy Delight
There’s something inherently comforting about a No-Bake Oreo Cheesecake – like a warm hug on a cool afternoon. The rich and creamy filling paired with the crunchy, chocolatey base evokes memories of childhood sleepovers, when we’d gather around, savoring our favorite cookie crumbs while sharing secrets and laughter. Each time I indulge in a slice of this sweet treat, I’m taken back to those carefree days where the only thing on my mind was who would have the last cookie. Whether you’re planning a festive gathering or just dreaming of a sweet escape at home, this easy weeknight dessert is perfect for any occasion.
Trust me, you’ll want to pin this recipe for later!
Why You’ll Love This Recipe
- Quick and Effortless: With no baking required, this creamy fall dessert is ready in no time!
- Crowd-Pleasing: Everyone loves Oreos, making this cheesecake a guaranteed hit at parties.
- Customizable: Easy to add your favorite flavors or toppings to make it your own.
- Family-Friendly: Kids will love helping to crush the cookies and mix the filling.
- Perfect Make-Ahead Treat: Just prepare it a day in advance and let it chill in the fridge.
Ingredients You’ll Need for No-Bake Oreo Cheesecake
- Oreo biscuits (for base)
- Cream cheese
- Oreo cookies (for cheesecake filling)
- Sugar
- Whipped cream (for topping)
- More Oreo cookies (for garnish)
How to Make No-Bake Oreo Cheesecake
Let’s make it together! Follow these simple steps to create your very own dreamy No-Bake Oreo Cheesecake:
-
Crush the Oreo Biscuits: Begin by crushing the Oreo biscuits into fine crumbs. Use a food processor, or simply place them in a ziplock bag and hit them with a rolling pin until finely crushed. Press these crumbs firmly into the bottom of your serving cups to form a delicious, crunchy base.
-
Mix the Filling: In a large mixing bowl, combine the cream cheese, crushed Oreo cookies, and sugar. Mix until the texture is smooth and creamy, evoking that luscious feeling of battening down the hatches for a cozy night in.
-
Spoon the Cheesecake Filling: Take your smooth cheesecake mixture and spoon it generously over the Oreo base in each cup. The contrast of the dark, crumbly base and the light, airy filling will have your taste buds dancing with delight.
-
Top It Off: Add a lovely dollop of whipped cream on top of each cheesecake cup. To make it even more special, sprinkle some crushed Oreo cookies for that extra touch of sweetness and texture.
-
Chill in the Fridge: Pop the cups in your refrigerator and allow them to chill for at least 2 hours. This waiting time is crucial, as it helps the flavors meld together beautifully and gives you that perfect slice when it’s time to dig in.
Delicious Variations to Try
- Mint Oreo Cheesecake: Add a splash of mint extract to the cream cheese filling for a refreshing, zesty twist.
- Chocolate Drizzle: Melt some chocolate and drizzle it over the whipped cream for an indulgent treat that adds a touch of elegance.
- Berry Bliss: Top your cheesecake with fresh berries for a burst of vibrant color and a hint of tartness that contrasts beautifully with the creamy filling.
- Peanut Butter Swirl: Swirl in some creamy peanut butter into the filling before you chill it for a nutty and indulgent delight.
Chef Emma’s Helpful Tips
- Make-Ahead Advice: This cheesecake is perfect for make-ahead planning. Prepare it a day in advance and keep it in the fridge for a ready-to-serve dessert.
- Ingredient Swaps: You can substitute Greek yogurt for cream cheese for a tangy twist and lighter texture.
- Slicing Tricks: To easily slice the cheesecake, run a knife under hot water before cutting, wiping it clean between slices for perfect edges.
- Storage Suggestions: Leftover cheesecake can be covered and stored in the refrigerator for up to 3 days. Just be sure to keep it sealed well to maintain its creamy texture!
What’s Inside – Nutrition Breakdown
- Serving Size: 1 cup
- Calories: 320
- Carbohydrates: 40g
- Sugar: 28g
- Fat: 17g
- Protein: 4g
- Sodium: 200mg
Frequently Asked Questions
Can I make this ahead?
Absolutely! This No-Bake Oreo Cheesecake is perfect for making ahead of time.
Can I use different ingredients?
Of course! Feel free to experiment with different types of cookies for the base or mix-ins for the filling.
How do I store leftovers?
Store any leftovers in an airtight container in the refrigerator for up to 3 days.
How long does it last?
This cheesecake can be stored in the fridge for about 3 days before losing its creamy texture.
A Cozy Closing Note
This No-Bake Oreo Cheesecake is not just a dessert; it’s a delightful experience that brings back sweet memories and creates new ones around the dining table. Its creamy texture, coupled with the indulgent Oreo flavor, is sure to charm everyone who takes a bite.
Save this No-Bake Oreo Cheesecake to your dessert board so it’s ready when you need a cozy treat! Happy baking, friends!
No-Bake Oreo Cheesecake
Ingredients
For the crust
- 24 pieces Oreo biscuits Crushed into fine crumbs for the base
For the filling
- 16 oz Cream cheese Softened for easier mixing
- 10 pieces Oreo cookies Crushed to mix into the cheesecake
- 1/2 cup Sugar To sweeten the filling
For the topping
- 1 cup Whipped cream For topping the cheesecake
- 2-3 pieces More Oreo cookies For garnish on top
Instructions
Preparation
- Crush the Oreo biscuits into fine crumbs using a food processor or by placing them in a ziplock bag and using a rolling pin.
- Press the crushed Oreo crumbs firmly into the bottom of serving cups to form the base.
Mixing the Filling
- In a large mixing bowl, combine the softened cream cheese, crushed Oreo cookies, and sugar.
- Mix until the mixture is smooth and creamy.
Assembly
- Spoon the cheesecake mixture generously over the Oreo base in each cup.
- Add a dollop of whipped cream on top of each cheesecake cup.
- Sprinkle some crushed Oreo cookies on top for garnish.
Chilling
- Refrigerate the cups for at least 2 hours to allow the flavors to meld.