
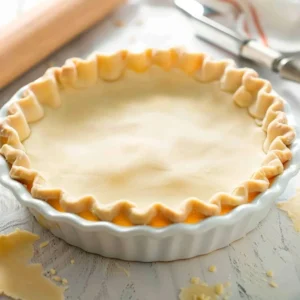
Cozy Gluten-Free Pie Crust Recipe
There’s something incredibly comforting about the aroma of a freshly baked pie wafting through the house. It evokes memories of sweet gatherings around the kitchen table, laughter mixing with the warmth of homemade treats. This Gluten-free Pie Crust is your ticket to creating those treasured moments, whether for a cozy family dinner or a festive Holiday celebration. With its flaky texture and comforting taste, this pie crust serves as the perfect foundation for any filling—fruit, custard, or creamy delights. This is one you’ll definitely want to pin for later!
Why You’ll Love This Recipe
- Quick to Prepare: This pie crust comes together in no time, making it perfect for busy weeknights or last-minute baking inspired by cravings.
- Crowd-Pleasing Flavor: With a buttery, rich taste that’s both flaky and tender, it’s sure to please everyone—especially those with dietary restrictions.
- Versatile: Use it for single-crust or double-crust pies, fruit-filled desserts, or even savory quiches. The options are endless!
- Easy to Customize: This pie crust is versatile enough to add different flavors or spices, enhancing your favorite fillings and bringing new creations to life.
- Make Ahead: Prepare the dough and store it in your fridge or freezer, ready to roll out whenever you need it for a delicious pie!
What You’ll Need
To make this delicious Gluten-free Pie Crust, gather these simple ingredients:
- 2 cups Cup4Cup Gluten-free Multipurpose Flour Blend
- 1 Tablespoon sugar
- 1/2 teaspoon table salt
- 1 cup cold butter (or cold shortening for dairy-free)
- 2 egg yolks (omit for egg-free, will need extra water)
- 1/3 cup ice water (divided)
Let’s Make It Together
Embark on this cozy kitchen adventure with me! Here’s how to make this delightful Gluten-free Pie Crust step by step:
-
Prep the Butter: Cube the butter into small pieces and place it in the freezer for about 15 minutes. We want it very cold but not frozen for that perfect flaky texture.
-
Mix the Egg Yolks: In a small bowl, whisk the egg yolks with 3 tablespoons of the ice-cold water. Place this in the fridge for later use.
-
Combine Dry Ingredients: In a large mixing bowl, whisk together the flour, sugar, and salt until evenly mixed.
-
Incorporate Butter: Add the cubed butter into the flour mixture. Toss to coat all the pieces well.
-
Blend Together: Using a stand mixer on low speed or your hands, gently work the butter into the flour. Squish the butter cubes into the flour, keeping them coated while you blend. Continue this process until the butter resembles a mix of large walnut-sized chunks and smaller pieces.
-
Add Egg Mixture: Retrieve the egg yolk and water mixture from the fridge and pour it into the flour mixture.
-
Mix: Stir together on low speed or with a spatula until just combined. The goal here is to avoid overmixing!
-
Moisten the Dough: Add one tablespoon of ice water at a time, mixing after each addition until the dough just holds together. It should feel moist without any dry flour spots, but not sticky.
-
Shape the Dough: Divide the mixture in half and form each piece into a ball. Wrap each tightly in plastic wrap, and refrigerate for at least 30 minutes. This step is crucial for maintaining that flaky texture.
-
Rolling Out the Dough: When you’re ready to bake, flour your surface with a bit more gluten-free flour. Roll out one ball for a single-crust or both for a double-crust pie, taking care to maintain an even thickness.
-
To Par-bake the Crust: If you’re making a filled pie that requires a pre-baked crust, par-bake the rolled dough at 375°F for 20 minutes or until just golden.
-
To Blind (Fully) Bake the Crust: For a completely baked crust, line it with parchment, fill with pie weights, and bake at 375°F for 25-30 minutes or until golden brown.
-
Baking a Filled Pie: After preparing your filling, pour it into the prepared crust and bake as directed in your specific recipe for a delicious pie experience.
Variations & Creative Twists
- Herbed Pie Crust: Add finely chopped fresh herbs like rosemary or thyme to the dough for a savory twist, perfect for quiches and savory pies.
- Sweet Spice: Incorporate a pinch of cinnamon or nutmeg into the flour mixture for a hint of warmth in dessert pies.
- Nutty Flavor: Replace a portion of the flour with ground nuts (almonds, pecans) for added texture and a rich flavor that complements fruit fillings beautifully.
- Chocolate Pie Crust: Mix in unsweetened cocoa powder to the flour for a chocolatey version, ideal for mousse or cream pies.
Chef Emma’s Helpful Tips
- Make Ahead: You can prepare the dough a day or two in advance and keep it wrapped tightly in the fridge or even freeze it for future use.
- Perfectly Sliced: To achieve beautiful slices of pie, let your pie cool completely before cutting. This helps the filling set and keeps it from oozing out.
- Flavor Boost: Don’t shy away from adding flavor to your pie crust! A teaspoon of vanilla extract or almond extract can work wonders in sweet pies.
- Storage: If you have leftovers, keep the crust in an airtight container in the fridge for up to 3 days or freeze for up to a month.
What’s Inside – Nutrition Breakdown
- Serving Size: 1 slice with filling
- Calories: 150
- Carbohydrates: 20g
- Sugar: 1g
- Fat: 8g
- Protein: 2g
- Sodium: 90mg
Frequently Asked Questions
-
Can I make this ahead?
Absolutely! You can prepare the dough and keep it in the fridge for a couple of days or freeze it for later. -
Can I use different ingredients?
Yes! You can substitute the butter with cold shortening for a dairy-free option or even try coconut oil for a unique flavor. -
How do I store leftovers?
Keep any leftover pie tightly covered in the refrigerator for about 3 days for best freshness. -
How long does it last?
Baked pie can last up to 3 days in the fridge, while unbaked dough can be frozen for up to a month.
A Cozy Closing Note
This Gluten-free Pie Crust is not just a recipe; it’s a pathway to creating memories filled with joy, warmth, and delicious flavors. Whether you’re whipping up a comforting pumpkin pie or a zesty lemon tart, this crust will be your go-to foundation. Save this Gluten-free Pie Crust to your cozy baking board so it’s ready when you need a delicious treat! Happy baking!
Gluten-Free Pie Crust
Ingredients
Pie Crust Ingredients
- 2 cups Cup4Cup Gluten-free Multipurpose Flour Blend
- 1 Tablespoon sugar
- 1/2 teaspoon table salt
- 1 cup cold butter (or cold shortening for dairy-free) Use cold shortening as a dairy-free option.
- 2 egg yolks egg yolks Omit for egg-free; will need extra water.
- 1/3 cup ice water (divided)
Instructions
Preparation
- Cube the butter into small pieces and place it in the freezer for about 15 minutes.
- In a small bowl, whisk the egg yolks with 3 tablespoons of the ice-cold water and place this in the fridge.
- In a large mixing bowl, whisk together the flour, sugar, and salt until evenly mixed.
- Add the cubed butter into the flour mixture and toss to coat all the pieces well.
- Using a stand mixer on low speed or your hands, gently work the butter into the flour until it resembles a mix of large walnut-sized chunks and smaller pieces.
- Pour the egg yolk and water mixture into the flour mixture and mix on low speed or with a spatula until just combined.
- Add one tablespoon of ice water at a time, mixing after each addition until the dough just holds together.
- Divide the mixture in half and form each piece into a ball, wrapping each tightly in plastic wrap and refrigerating for at least 30 minutes.
Rolling and Baking
- Flour your surface and roll out one ball for a single-crust or both for a double-crust pie.
- To par-bake the crust, roll the dough and bake at 375°F for 20 minutes or until just golden.
- For a fully baked crust, line it with parchment, fill with pie weights, and bake at 375°F for 25-30 minutes or until golden brown.
- After preparing your filling, pour it into the prepared crust and bake as directed in your specific recipe.